Set Administrator Password
Administrator Tool Settings
Administrator Profiles
Single Sign-on Considerations for Windows* Vista* and Windows* 7
Application Settings
Adapter Settings
EAP-FAST A-ID Groups
The Administrator Tool is used to create custom install packages that can be exported to client systems running Microsoft Windows* XP, Windows Vista* and Windows* 7. The Administrator Tool is used to configure user settings and common (shared) WiFi network profiles. The tool is used by the person who has administrator privileges on this computer. Users cannot modify Administrator settings or profiles unless they have the password for this tool. A password should be chosen that is secure and not easily guessed.
The Administrator Tool is located on the Tools menu, accessed inside the Intel® PROSet/Wireless WiFi Connection Utility.
The feature must be selected during a custom installation of the Intel® PROSet/Wireless WiFi Connection Utility or the feature is not displayed.
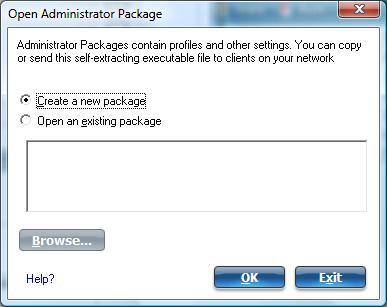
An Administrator Package is a self-extracting executable file that contains administrative profiles and other user settings. You can copy or send an administrative package to clients on your network. When the executable runs, the contents are installed and configured on the destination computer. If a profile is part of the package, the profile governs how the destination computer connects to a specific WiFi network. For information about profiles, see Administrator Profiles.

Name Description Create a new package
Create a package that can be exported to a client computer. The client computer can run Windows* XP, Windows Vista*, or Windows* 7. The package capabilities will vary, depending on the client OS. This package allows export of 802.1X authentication EAP-type, Pre-logon/Common and Persistent profiles. However, there are exceptions for Single Sign-on profiles that will be exported to Windows Vista* and Windows* 7 clients. See Administrator Profiles.
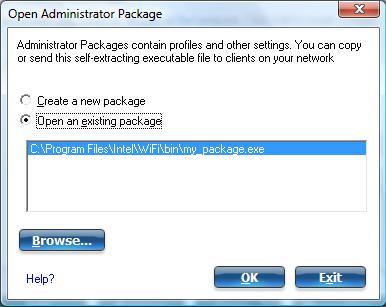
Open an existing package
Select to browse for and open an existing package.
Name Description Click Include Profiles in this package (this should already be checked). Profiles can be shared with other users. Click Profiles here for more information and instructions.
Click the Application Settings tab. Click Include Application Settings in this package (this should already be checked). Specify application settings to be enabled. Click Application Settings here for more information and instructions.
Click the Adapter Settings tab. Click Include Adapter Settings in this package. Specify initial values for adapter settings used on this computer. Click Adapter Settings here for more information and instructions.
Click the EAP-FAST A-ID Groups tab. Click Include A-ID Groups. Add A-ID Group to support multiple PACs from multiple A-IDs. Click EAP-FAST A-ID Groups here for more information and instructions.
NOTE: You can also select Save Package on the File menu to save the package.

NOTE: You can also select Open Package on the File menu to edit an Administrator Package.
NOTE: If you create an Administrator Package for a Windows* XP Professional x64 Edition system, the language files are located in the \XP\Docs and the \XP\x64\Install\Lang folders on that system.
See:
Administrator Profiles are owned and managed by the network administrator or the administrator of this computer. These profiles are shared by all users on this computer. However, end users cannot modify these profiles. They can only be modified from the Administrator Tool, which is password protected. There are two types of Administrator Profiles: Persistent or Pre-logon/Common. You can also configure Voice over IP (VoIP) settings for export to a soft-phone application.
The following information applies only to Single Sign-On (SSO) profiles created for Windows* Vista* and Windows* 7* clients.
For specific information about each profile type, see the following:
Persistent profiles are applied at boot time or whenever no one is logged on the computer. After a user logs off, a Persistent profile maintains a wireless connection either until the computer is turned off, or a different user logs on.
NOTE: Persistent profiles are not supported for Windows Vista* or Windows* 7. See Single Sign-on Considerations for Windows Vista* and Windows* 7.
Persistent profile key points:
NOTE: The WiFi connection utility supports machine certificates. However, they are not displayed in the certificate listings.
Following are general instructions for this type of Administrator profile. For more detailed information and restrictions, see Create Profiles for Windows*.
You can copy an existing profile, giving the copy a new name. You may want to do this in order to have two similar profiles. To copy a profile:
The new profile is saved. This new profile has the same properties as the original.
Pre-logon/Common profiles are applied once a user logs on. If Single Sign On support is installed, the connection is made prior to the Windows log-on sequence (Pre-logon/Common). If Single Sign On support is not installed, the profile is applied once the user session is active. Pre-logon/Common profiles always appear at the top of the Profiles list. Users can still prioritize profiles that they have created but they cannot reprioritize Pre-logon/Common profiles. Because these profiles appear at the top of the Profiles list, the WiFi connection utility automatically attempts to connect to the Administrator profiles first before any user-created profiles.
NOTE: Only administrators can create or export Pre-logon/Common profiles.
Pre-logon Connect key points are:
Pre-logon/Common profiles support is installed during a Custom install of the WiFi connection utility. See Install or Uninstall the Single Sign On Feature for more information.
NOTE: If the Single Sign On or Pre-logon Connect features are not installed, an administrator is still able to create Pre-logon/Common profiles for export to a user's computer.
The following describes how the Pre-logon Connect feature functions from system power-up. The assumption is that a saved profile exits. This saved profile has valid security settings marked with "Use Windows Logon user name and password" that are applied at the time of Windows log on.
NOTE: A user certificate can only be accessed by a user that has been authenticated on the computer. Therefore, a user should log onto the computer once (using either a wired connection, alternate profile or local log in) before using a Pre-logon/Common profile that authenticates with a user certificate.
When you log off, any wireless connection is disconnected and a Persistent profile (if one is available) is applied. Under certain circumstances, it is desirable to maintain the current connection (for example, if user-specific data needs to be uploaded to the server post-logoff or when roaming profiles are used). Create a profile that is marked as both Pre-logon/Common and Persistent to achieve this functionality. If such a profile is active when the user logs off, the connection is maintained.
Following are general instructions for this type of Administrator profile. For more detailed information and restrictions, see Create Profiles for Windows*.
NOTE: If a Persistent connection was already established, a Pre-logon/Common profile is ignored unless the profile is configured with both Pre-logon/Common and Persistent connection options.
You can copy an existing profile, giving the copy a new name. You can edit the new profile. You may want to do this in order to have two similar profiles. To copy a profile:
The new profile is saved. This new profile has the same properties as the original.
Click Creating Administrator Profiles for Enterprise Security for more information.
Administrators can designate networks to be excluded from connection. Once a network is excluded, only an administrator can remove the network from the Exclude list. The excluded network is displayed in the Exclude List Management, and is indicated by this icon: ![]()
NOTE: Unavailable for Windows Vista* and Windows* 7 packages.
To exclude a network:
To remove a network from exclusion:
The WiFi connection utility supports VoIP third-party soft-phone applications. Third-party VoIP applications support Voice Codecs. Codecs generally provide a compression capability to save network bandwidth. The WiFi connection utility supports the following International Telecommunications Union (ITU) codec standards:
Codec Algorithm ITU G.711
PCM (Pulse Code Modulation)
ITU G.722
SBADPCM (Sub-Band Adaptive Differential Pulse Code Modulation)
ITU G.723
Multi-rate Coder
ITU G.726
ADPCM (Adaptive Differential Pulse Code Modulation)
ITU G.727
Variable-Rate ADPCM
ITU G.728
LD-CELP (Low-Delay Code Excited Linear Prediction)
ITU G.729
CS-ACELP (Conjugate Structure Algebraic-Code Excited Linear Prediction)
An administrator can export VoIP settings to configure various codec data rates and frame rates to improve voice quality in VoIP transmissions. To create a VoIP profile:
NOTE: Check that Voice over IP is not disabled in the Administrator Tool Application Settings. It is enabled by default.
G711 has 10ms frame rate with 64kbps bit rate
G722 has 10ms frame rate with 64kbps bit rate
G723 has 30ms frame rate with either 5.3kbps or 6.4kbps bit rate
G726-32 has 10ms frame rate with 32kbps bit rate
G728 has 2.5ms frame rate with 16kbps bit rate
G729 has 10ms frame rate with 10kbps bit rateSelect parameters from the drop down menus.
Codec Usage Frame Rate
- G711_64kbps
- G722_64kbps
- G722_56kbps
- G722_48kbps
- G722_1_32kbps
- G722_1_24kbps
- G722_1_16kbps
- G726_16kbps
- G726_24kbps
- G726_32kbps
- G726_40kbps
- G728_16kbps
- G729a_8kbps
- G729e_11_8kbps
- GIPS_iPCM_VARIABLE
- G722_2_VARIABLE
- Interactive voice
- Audio conference
- Voice data
- Video
- Streaming audio
- 20
- 30
An administrator can configure the WiFi connection utility Application Settings to control how the application behaves on the user's computer, and to select what level of control users have over various aspects of their wireless connections. See Application Settings.
An administrator can configure the adapter settings for the WiFi adapter installed on the user's computer. See Adapter Settings.
NOTE: This feature is unavailable if CCXv4 is not selected in the Administrator Tool Application Settings.
An Authority Identifier (A-ID) is the RADIUS server that provisions Protected Access Credentials (PACs) A-ID groups. A-ID groups are shared by all users of the computer and allow EAP-FAST profiles to support multiple PACs from multiple A-IDs. The A-ID groups can be pre-configured by the administrator and set up through an Administrator Package on a user's computer. When a wireless network profile encounters a server with an A-ID within the same group of the A-ID specified in the wireless network profile, it uses this PAC without a prompt to the user.
To add an A-ID Group:
If the A-ID group is locked, then additional A-IDs cannot be added to the group.
To add an A-ID to an A-ID group: