Configure Profiles for Network (Infrastructure) Operating Mode
An infrastructure network consists of one or more access points and one or more computers with WiFi adapters installed. Each access point must have a wired connection to a WiFi network. This section describes how to create various WiFi profiles.
Create a Windows XP* Profile with No Authentication or Data Encryption (None)
CAUTION: Networks using no authentication or encryption are highly vulnerable to access by unauthorized users.
To create a profile for a WiFi network connection with no encryption:
-
Click Profiles on the Intel(R) PROSet/Wireless WiFi Connection Utility main window.
Or if you are acting as the administrator, open the Administrator Tool.
- On the Profiles list/tab, click Add to open the Create WiFi Profile General Settings.
- Profile Name: Enter a descriptive profile name.
- WiFi Network Name (SSID): Enter the network identifier.
- Operating Mode: Click Network (Infrastructure). (This parameter is set to Infrastructure if you are using the Administrator Tool.)
- Administrator Profile Type:
Select Persistent or Pre-logon/Common. (This step applies only if you are using the Administrator Tool.)
- Click Next to open the Security Settings.
- Click Enterprise Security.
- Network Authentication: Open (Selected).
Open authentication allows a wireless device access to the network without 802.11 authentication. If no encryption is enabled on the network, any wireless device with the correct network name (SSID) can associate with an access point and gain access to the network.
- Data Encryption: None is the default.
- Click OK. The profile is added to the Profiles list and connects to the wireless network.
Create a Windows XP* Profile with Shared Network Authentication
When shared key authentication is used, each wireless station is assumed to have received a secret shared key over a secure channel that is independent from the 802.11 wireless network communications channel. Shared key authentication requires that the client configure a static WEP or CKIP key. The client access is granted only if it passes a challenge-based authentication. CKIP provides stronger data encryption than WEP, but not all operating systems and access points support it.
NOTE: While shared key would appear to be the better option for a higher level of security, a known weakness is created by the clear text transmission of the challenge string to the client. Once an invader sniffs for the challenge string, the shared authentication key can be easily reverse engineered. Therefore, open authentication (with data encryption) is actually, and counter intuitively, more secure.
To create a profile with shared authentication:
-
Click Profiles on the WiFi connection utility main window.
Or if you are acting as the administrator, open the Administrator Tool.
- On the Profiles list/tab, click Add to open the Create WiFi Profile General Settings.
- Profile Name: Enter a descriptive profile name.
- WiFi Network Name (SSID): Enter the network identifier.
- Operating Mode: Click Network (Infrastructure). (This parameter is set to Infrastructure if you are using the Administrator Tool.)
- Administrator Profile Type:
Select Persistent or Pre-logon/Common. (This step applies only if you are using the Administrator Tool.)
- Click Next to open the Security Settings.
- Click Enterprise Security.
- Network Authentication: Select Shared. Shared authentication is accomplished with a pre-configured WEP key.
- Data Encryption: Select None, WEP (64-bit or 128-bit), or CKIP (64-bit or 128-bit).
- Enable 802.1X: Disabled.
- Encryption Level: 64-bit or 128-bit: When switching between 64-bit and 128-bit encryption, the previous settings are erased and a new key must be entered.
- Key Index: Select 1, 2, 3, or 4.
Change the Key Index to specify up to four passwords.
- Wireless Security Password (Encryption Key): Enter the wireless network password (Encryption Key). This password is the same value used by the wireless access point or router. Contact your administrator for this password.
- Pass phrase (64-bit): Enter five (5) alphanumeric characters, 0-9, a-z or A-Z.
- Hex key (64-bit): Enter 10 hexadecimal characters, 0-9, A-F.
- Pass phrase (128-bit): Enter 13 alphanumeric characters, 0-9, a-z or A-Z.
- Hex key (128-bit): Enter 26 hexadecimal characters, 0-9, A-F.
Create a Windows XP* Profile with WPA-Personal or WPA2-Personal Network Authentication
Wi-Fi Protected Access (WPA) is a security enhancement that strongly increases the level of data protection and access control to a wireless network. WPA-Personal enforces key-exchange and only works with dynamic encryption keys. If your wireless access point or router supports WPA-Personal or WPA2-Personal, then you should enable it on the access point and provide a long, strong password. For personal or home networks without a RADIUS or AAA server, use Wi-Fi Protected Access Personal.
- WPA-Personal: A wireless security method that provides strong data protection and prevents unauthorized network access for small networks. It uses Temporal Key Integrity Protocol (TKIP) or AES-CCMP encryption and protects against unauthorized network access through the use of a pre-shared key (PSK).
- WPA2-Personal: A follow-on wireless security method to WPA that provides stronger data protection and prevents unauthorized network access for small networks.
NOTE: WPA-Personal and WPA2-Personal are interoperable.
Some security solutions may not be supported by your computer's operating system and may require additional software or certain hardware as well as wireless LAN infrastructure support. Check with your computer manufacturer for details.
To add a profile with WPA-Personal or WPA2-Personal network authentication:
-
Click Profiles on the WiFi connection utility main window.
Or if you are acting as the administrator, open the Administrator Tool.
- On the Profiles list/tab, click Add to open the Create WiFi Profile General Settings.
- Profile Name: Enter a descriptive profile name.
- WiFi Network Name (SSID): Enter the network identifier.
- Operating Mode: Click Network (Infrastructure). (This parameter is set to Infrastructure if you are using the Administrator Tool.)
- Administrator Profile Type:
Select Persistent or Pre-logon/Common. (This step applies only if you are using the Administrator Tool.)
- Click Next to open the Security Settings.
- Click Enterprise Security.
- Network Authentication: Select WPA-Personal or WPA2-Personal. See Security Overview.
- Data Encryption: Select either TKIP or AES-CCMP.
- Password: Enter a text phrase from 8 to 63 characters. The longer the password, the stronger the security of the wireless network. The same password entered into an access points needs to be used on this computer and all other wireless devices that access the wireless network.
Create a Windows XP* Profile with WPA-Enterprise or WPA2-Enterprise Network Authentication
WPA2-Enterprise requires an authentication server.
- WPA-Enterprise: A wireless security method that provides strong data protection for multiple users and large managed networks. It uses the 802.1X authentication framework with TKIP or AES-CCMP encryption and prevents unauthorized network access by verifying network users through an authentication server.
- WPA2-Enterprise: The follow-on wireless security method to WPA that provides stronger data protection for multiple users and large managed networks. It prevents unauthorized network access by verifying network users through an authentication server.
NOTE: WPA-Enterprise and WPA2-Enterprise are interoperable.
To add a profile that uses WPA-Enterprise or WPA2-Enterprise authentication:
- Obtain a user name and password on the RADIUS server from your administrator.
- Certain Authentication Types require that you obtain and install a client certificate. See Create a Profile with TLS authentication or consult your administrator.
-
Click Profiles on the WiFi connection utility main window.
Or if you are acting as the administrator, open the Administrator Tool.
- On the Profiles list, click Add to open the Create WiFi Profile General Settings.
- Profile Name: Enter a descriptive profile name.
- WiFi Network Name (SSID): Enter the network identifier.
- Operating Mode: Click Network (Infrastructure). (This parameter is set to Infrastructure if you are using the Administrator Tool.)
- Administrator Profile Type:
Select Persistent or Pre-logon/Common. (This step applies only if you are using the Administrator Tool.)
- Click Next to open the Security Settings.
- Click Enterprise Security.
- Network Authentication:
Select WPA-Enterprise or WPA2-Enterprise.
- Data Encryption: Select either TKIP or AES-CCMP.
- Enable 802.1X: Selected by default.
- Authentication Type: Select one of the following: EAP-SIM, LEAP, TLS, TTLS, PEAP, or EAP-FAST.
Configure a Network Profile with 802.1X Authentication Types
Create a Windows XP* Profile with WEP Data Encryption and EAP-SIM Network Authentication
EAP-SIM uses a dynamic session-based WEP key, which is derived from the client adapter and RADIUS server, to encrypt data. EAP-SIM requires you to enter a user verification code, or PIN, for communication with the Subscriber Identity Module (SIM) card. A SIM card is a special smart card that is used by Global System for Mobile Communications (GSM) based digital cellular networks.
To add a profile with EAP-SIM authentication:
-
Click Profiles on the WiFi connection utility main window.
Or if you are acting as the administrator, open the Administrator Tool.
- On the Profiles list, click Add to open the Create WiFi Profile General Settings.
- Profile Name: Enter a profile name.
- WiFi Network Name (SSID): Enter the network identifier.
- Operating Mode: Click Network (Infrastructure). (This parameter is set to Infrastructure if you are using the Administrator Tool.)
- Administrator Profile Type:
Select Pre-logon/Common. (This step applies only if you are using the Administrator Tool. EAP-SIM cannot be used for Persistent profiles.)
- Click Next to open the Security Settings.
- Click Enterprise Security.
- Network Authentication: Select Open (Recommended).
- Data Encryption: Select WEP.
- Click Enable 802.1X.
- Authentication Type: Select EAP-SIM.
EAP-SIM authentication can be used with:
- Network Authentication types: Open, Shared, WPA-Enterprise and WPA2-Enterprise
- Data Encryption types: None, WEP, TKIP, AES-CCMP and CKIP
EAP-SIM User (optional)
- Click Specify user name (identity):
- At User Name: Enter the user name assigned to the SIM card.
- Click OK.
Create a Windows XP* Profile with EAP-AKA Network Authentication
EAP-AKA (Extensible Authentication Protocol Method for UMTS Authentication and Key Agreement) is an EAP mechanism for authentication and session key distribution, using the Universal Mobile Telecommunications System (UMTS) Subscriber Identity Module (USIM). The USIM card is a special smart card used with cellular networks to validate a given user with the network.
EAP-AKA authentication can be used with:
- Network Authentication types: Open, WPA-Enterprise and WPA2-Enterprise
- Data Encryption types: WEP or CKIP for Open authentication, TKIP or AES-CCMP for Enterprise authentication.
EAP-AKA uses Enterprise Security and for network authentication, can use Open, WPA Enterprise, or WPA2 Enterprise.
To add a profile with EAP-AKA authentication:
-
Click Profiles on the WiFi connection utility main window.
Or if you are acting as the administrator, open the Administrator Tool.
- On the Profiles list, click Add to open the Create WiFi Profile General Settings.
- Profile Name: Enter a profile name.
- WiFi Network Name (SSID): Enter the network identifier.
- Operating Mode: Click Network (Infrastructure). (This parameter is set to Infrastructure if you are using the Administrator Tool.)
- Administrator Profile Type:
Select Pre-logon/Common. (This step applies only if you are using the Administrator Tool. EAP-SIM cannot be used for Persistent profiles.)
- Click Next to open the Security Settings.
- Click Enterprise Security.
- Network Authentication: Select Open, WPA-Enterprise, or WPA2-Enterprise.
- Data Encryption: Select WEP or CKIP for Open authentication, TKIP or AES-CCMP for Enterprise authentication.
- Click Enable 802.1X if it is not already selected.
- Authentication Type: Select EAP-AKA.
EAP-AKA User (optional)
- Click Specify user name (identity):
- At User Name: Enter the user name assigned to the USIM card.
- Click OK.
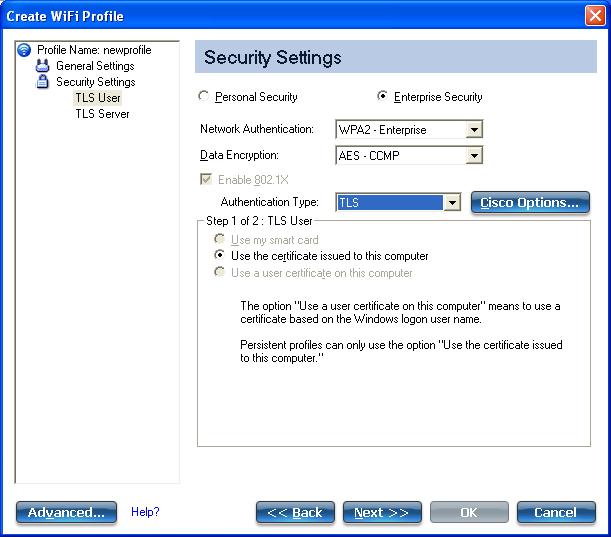
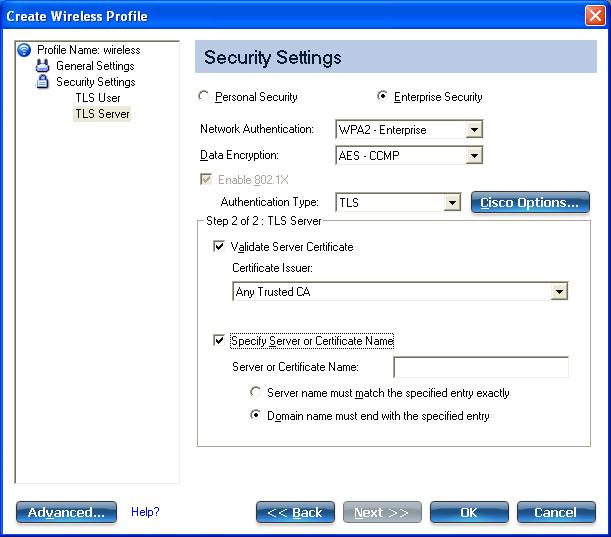
Create a Windows XP* Profile with TLS Network Authentication
These settings define the protocol and the credentials used to authenticate a user. Transport Layer Security (TLS) authentication is a two-way authentication method that exclusively uses digital certificates to verify the identity of a client and a server.
To add a profile with TLS authentication:
-
Click Profiles on the WiFi connection utility main window.
Or if you are acting as the administrator, open the Administrator Tool.
- On the Profiles list, click Add to open the Create WiFi Profile General Settings.
- Profile Name: Enter a descriptive profile name.
- WiFi Network Name (SSID): Enter the network identifier.
- Operating Mode: Click Network (Infrastructure). (This parameter is set to Infrastructure if you are using the Administrator Tool.)
- Administrator Profile Type:
Select Persistent or Pre-logon/Common. (This step applies only if you are using the Administrator Tool.)
- Click Next to open the Security Settings.
- Click Enterprise Security.
- Network Authentication: Select WPA-Enterprise or WPA2-Enterprise (Recommended).
- Data Encryption: Select AES-CCMP (Recommended).
- Enable 802.1X: Selected by default.
- Authentication Type: Select TLS to be used with this connection.
Step 1 of 2: TLS User
- Obtain and install a client certificate. See Create a Profile with TLS authentication or consult your system administrator.
- Select one of the following to obtain a certificate: Use my smart card, Use the certificate issued to this computer, or Use a user certificate on this computer.
- Click Next to open the TLS Server settings.
Step 2 of 2: TLS Server
- Select one of the following credential retrieval methods: Validate Server Certificate or Specify Server or Certificate Name.
- Click OK. The profile is added to the Profiles list.
- Click the new profile at the end of the Profiles list. Use the up and down arrows to change the priority of the new profile.
- Click Connect to connect to the selected wireless network.
- Click OK to close Intel PROSet/Wireless WiFi.
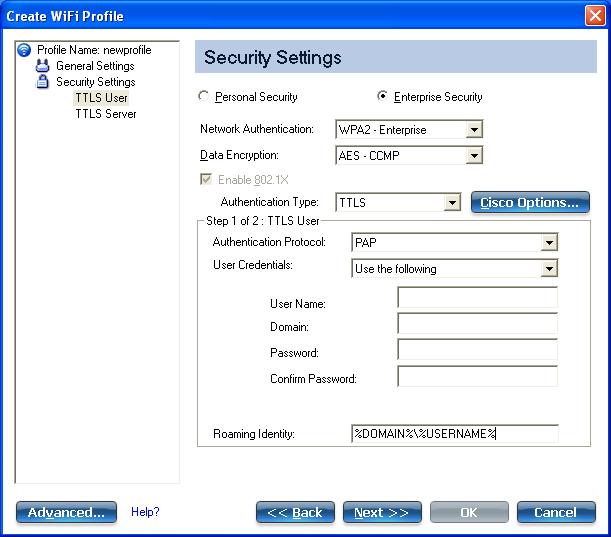
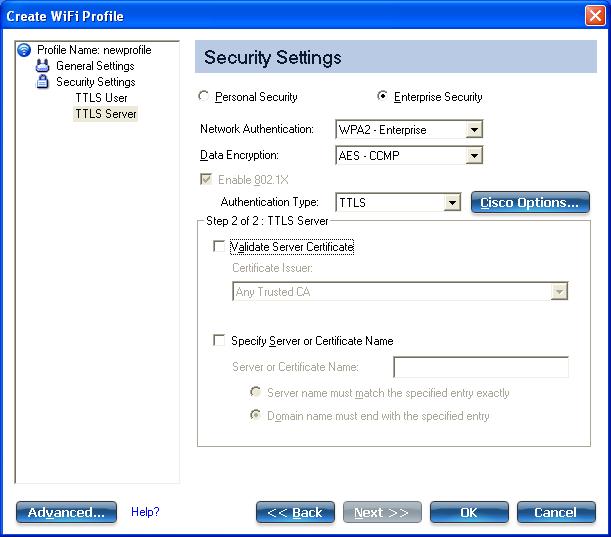
Create a Windows XP* Profile with TTLS Network Authentication
TTLS authentication: These settings define the protocol and credentials used to authenticate a user. The client uses EAP-TLS to validate the server and create a TLS-encrypted channel between the client and server. The client can use another authentication protocol. Typically password-based protocols challenge over a non-exposed TLS encrypted channel.
To set up a client with TTLS Authentication:
-
Click Profiles on the WiFi connection utility main window.
Or if you are acting as the administrator, open the Administrator Tool.
- On the Profiles list, click Add to open the Create WiFi Profile General Settings.
- Profile Name: Enter a descriptive profile name.
- WiFi Network Name (SSID): Enter the network identifier.
- Operating Mode: Click Network (Infrastructure). (This parameter is set to Infrastructure if you are using the Administrator Tool.)
- Administrator Profile Type:
Select Persistent or Pre-logon/Common. (This step applies only if you are using the Administrator Tool.)
- Click Next to open the Security Settings.
- Click Enterprise Security.
- Network Authentication: Select WPA-Enterprise or WPA2-Enterprise (Recommended).
- Data Encryption: Select TKIP or AES-CCMP (Recommended).
- Enable 802.1X: Selected by default.
- Authentication Type: Select TTLS to be used with this connection.
Step 1 of 2: TTLS User
- Authentication Protocol: This parameter specifies the authentication protocol operating over the TTLS tunnel. The protocols are: PAP (Default), CHAP, MS-CHAP and MS-CHAP-V2. See Security Overview for more information.
- User Credentials: For PAP, CHAP, MS-CHAP, and MS-CHAP-V2 protocols, select one of these authentication methods: Use Windows logon, Prompt each time I connect, or Use the following.
- Roaming Identity: A Roaming Identity may be populated in this field or you can use %domain%\%username% as the default format for entering a roaming identity.
When 802.1X Microsoft IAS RADIUS is used as an authentication server, the server authenticates the device using the Roaming Identity from Intel PROSet/Wireless WiFi software, and ignores the Authentication Protocol MS-CHAP-V2 user name. Microsoft IAS RADIUS accepts only a valid user name (dotNet user) for the Roaming Identity. For all other authentication servers, the Roaming Identity is optional. Therefore, it is recommended to use the desired realm (for example, anonymous@myrealm) for the Roaming Identity rather than a true identity.
- Click Next to access the TTLS Server settings.
Step 2 of 2: TTLS Server
- Select one of the following credential retrieval methods: Validate Server Certificate or Specify Server or Certificate Name.
- Click OK to save the setting and close the page.
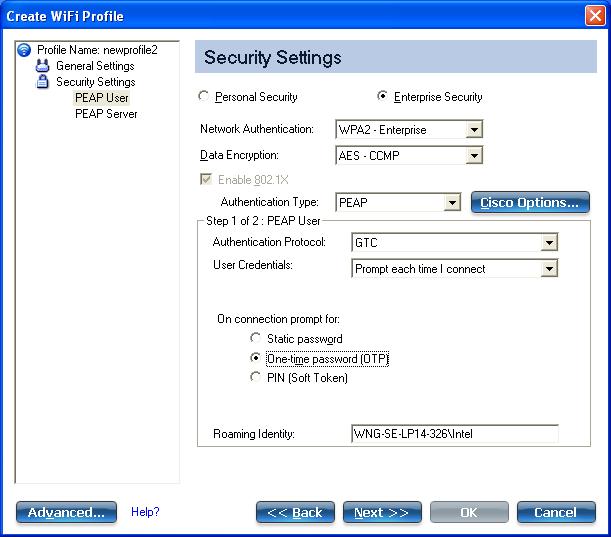
Create a Windows XP* Profile with PEAP Network Authentication
PEAP authentication: PEAP settings are required for the authentication of the client to the authentication server. The client uses EAP-TLS to validate the server and create a TLS-encrypted channel between client and server. The client can use another EAP mechanism, such as Microsoft Challenge Authentication Protocol (MS-CHAP) Version 2, over this encrypted channel to enable server validation. The challenge and response packets are sent over a non-exposed TLS encrypted channel. The following example describes how to use WPA with AES-CCMP or TKIP encryption with PEAP authentication.
To set up a client with PEAP Authentication: Obtain and install a client certificate. See Create a Windows XP* Profile for TLS authentication or consult your administrator.
-
Click Profiles on the WiFi connection utility main window.
Or if you are acting as the administrator, open the Administrator Tool.
- On the Profiles list, click Add to open the Create WiFi Profile General Settings.
- Profile Name: Enter a descriptive profile name.
- WiFi Network Name (SSID): Enter the network identifier.
- Operating Mode: Click Network (Infrastructure). (This parameter is set to Infrastructure if you are using the Administrator Tool.)
- Administrator Profile Type:
Select Persistent or Pre-logon/Common. (This step applies only if you are using the Administrator Tool.)
- Click Next to open the Security Settings.
- Click Enterprise Security.
- Network Authentication: Select WPA-Enterprise or WPA2-Enterprise (Recommended).
- Data Encryption: Select one of the following: AES-CCMP is recommended.
- Enable 802.1X: Selected by default.
- Authentication Type: Select PEAP to be used with this connection.
Step 1 of 2: PEAP User
PEAP relies on Transport Layer Security (TLS) to allow unencrypted authentication types such as EAP-Generic Token Card (GTC) and One-Time Password (OTP) support.
- Authentication Protocol: Select either GTC, MS-CHAP-V2 (Default), or TLS. See Authentication Protocols.
- User Credentials: For GTC or MS-CHAP-V2, select one of the following: Use Windows logon, Prompt each time I connect, or Use the following. For TLS, select Use my smart card, Use the certificate issued to this computer, or Use a user certificate on this computer. (If you are creating an Administrator Profile, then only Use the certificate issued to this computer is available.)
- Roaming Identity: A Roaming Identity may be populated in this field or you can use %domain%\%username% as the default format for entering a roaming identity.
When 802.1X Microsoft IAS RADIUS is used as an authentication server, the server authenticates the device using the Roaming Identity from Intel PROSet/Wireless WiFi software, and ignores the Authentication Protocol MS-CHAP-V2 user name. Microsoft IAS RADIUS accepts only a valid user name (dotNet user) for the Roaming Identity. For all other authentication servers, the Roaming Identity is optional. Therefore, it is recommended to use the desired realm (for example, anonymous@myrealm) for the Roaming Identity rather than a true identity.
Configure Roaming Identity to Support Multiple Users:
If you use a
Pre-logon/Common profile that requires the roaming identity to be based on the Windows logon credentials, the creator of the profile can add a roaming identity that uses %username% and %domain%. The roaming identity is parsed and the appropriate log on information is substituted for the keywords. This allows maximum flexibility in configuring the roaming identity while allowing multiple users to share the profile.
Please see your authentication server user guide for directions about how to format a suitable roaming identity. Possible formats are:
%domain%\%user_name%
%user_name%@%domain%
%user_name%@%domain%.com
%user_name%@mynetwork.com
If Roaming Identity is blank, %domain%\%username% is the default.
Notes about the credentials: This user name and domain must match the user name that is set in the authentication server by the administrator prior to client authentication. The user name is case-sensitive. This name specifies the identity supplied to the authenticator by the authentication protocol operating over the TLS tunnel. This user identity is securely transmitted to the server only after an encrypted channel has been verified and established.
Authentication Protocols
This parameter specifies the authentication protocols that can operate over the TTLS tunnel. Next are instructions on how to configure a profile that uses PEAP authentication with GTC, MS-CHAP-V2 (Default), or TLS authentication protocols.
Generic Token Card (GTC)
To configure a one-time password:
- Authentication Protocol: Select GTC (Generic Token Card).
- User Credentials: Select Prompt each time I connect. (This is only available if you are creating a personal profile. Not available for IT profiles.)
- On connection prompt for: Select one of the following:
| Name |
Description |
| Static Password |
On connection, enter the user credentials. |
| One-time password (OTP) |
Obtain the password from a hardware token device. |
| PIN (Soft Token) |
Obtain the password from a soft token program. |
NOTE: The Prompt each time I connect option is unavailable if an Administrator has cleared the Cache Credentials setting in the Administrator Tool. See Administrator Application Settings for more information.
- Click OK.
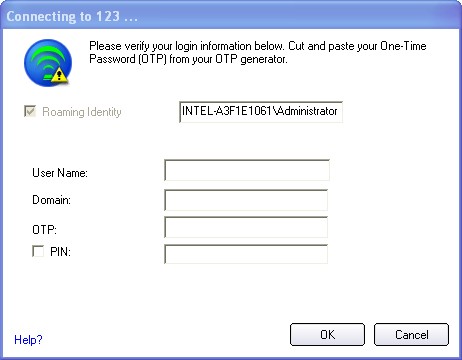
- If you are acting as the user, perform the following three steps.
- Select the profile on the WiFi Networks list.
- Click Connect. When prompted, enter the user name, domain and OTP.
- Click OK. You are asked to verify your log in information.
MS-CHAP-V2: This parameter specifies the authentication protocol operating over the PEAP tunnel.
- User Credentials: Select one of the following options: Use Windows logon, Prompt each time I connect, or Use the following.
- Click Next to open the PEAP Server settings.
TLS: Transport Layer Security authentication is a two-way authentication method that exclusively uses digital certificates to verify the identity of a client and a server.
- Obtain and install a client certificate. See Create a Windows XP* Profile for TLS authentication or consult your system administrator.
- Select one of the following to obtain a certificate: Use my smart card, Use the certificate issued to this computer, or Use a user certificate on this computer.
- Click Next to open the PEAP Server settings.
Step 2 of 2: PEAP Server
- Select one of the following credential retrieval methods: Validate Server Certificate or Specify Server or Certificate Name.
- Click OK. The profile is added to the Profiles list.
- Click the new profile at the end of the Profiles list. Use the up and down arrows to change the priority of the new profile.
- Click Connect to connect to the selected wireless network.
If you did not select Use Windows logon on the Security Settings page and also did not configure user credentials, no credentials are saved for this profile. Please enter your credentials to authenticate to the network.
- Click OK to close Intel PROSet/Wireless WiFi.
PEAP-TLS Certificate Auto Enrollment
In the Application Settings, select Enable TLS rejected certificates notification if you want a warning issued when a PEAP-TLS certificate is rejected. When a certificate has an invalid field expiration date, you are notified that you must take one of the following actions:
A potential authentication problem for profile has been detected. The expiration date in the associated certificate may be invalid. Choose one of the following options:
| Control |
Description |
| Continue with current parameters. |
Continue with the current certificate. |
| Update certificate manually. |
The Select Certificate page opens for you to choose another certificate. |
| Update certificate automatically based on the certificates in the local store. |
This option is enabled only when the local store holds one or more certificates for which the "issued to" and "issued by" fields match the current certificate and for which the "expiration date" has not expired. If you choose this option, the application selects the first valid certificate. |
| Log off to obtain certificate during logon process (this does not update the profile and only applies to certificates configured for auto enrollment). |
Logs off the user, who must obtain a proper certificate during the next logon process. The profile must be updated to select the new certificate. |
| Auto enrollment |
You are notified to: Please wait while the system is trying to obtain the certificate automatically. Click Cancel to end the certificate retrieval. |
| Do not show this message again. |
A user is able to avoid this step in subsequent sessions. The choice selected is remembered for future sessions. |
Create a Windows XP* Profile with LEAP Network Authentication
Cisco LEAP (Light Extensible Authentication Protocol) is an 802.1X authentication type that supports strong mutual authentication between the client and a RADIUS server. The LEAP profiles settings include LEAP, CKIP with Rogue access point detection integration. To set up a client with LEAP authentication:
-
Click Profiles on the WiFi connection utility main window.
Or if you are acting as the administrator, open the Administrator Tool.
- On the Profiles list, click Add. The Create WiFi Profile General Settings opens.
- Profile Name: Enter a descriptive profile name.
- WiFi Network Name (SSID): Enter the network identifier.
- Operating Mode: Click Network (Infrastructure). (This parameter is set to Infrastructure if you are using the Administrator Tool.)
- Administrator Profile Type:
Select Persistent or Pre-logon/Common. (This step applies only if you are using the Administrator Tool.)
- Click Next to open the Security Settings.
- Click Enterprise Security.
- Network Authentication: Select WPA-Enterprise or WPA2-Enterprise (Recommended).
- Data Encryption: AES-CCMP is recommended.
- Enable 802.1X: Selected by default.
- Authentication Type: Select LEAP to be used with this connection.
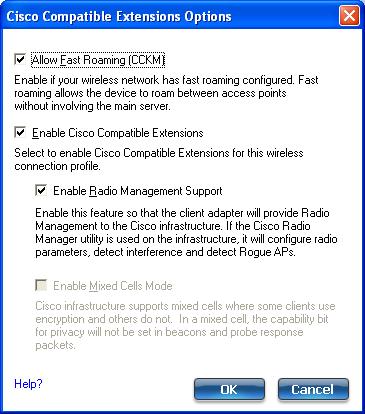
- Click Cisco Options.
-
Click Enable Cisco Compatible Extensions to enable Cisco Compatible Extensions (CCX) security (Allow Fast Roaming (CCKM), Enable Radio Management Support, and Enable Mixed Cells Mode).
- Click Enable Radio Management Support to detect rogue access points.
- Click OK to return to the Security Settings.
LEAP User:
- Select one of the following authentication methods listed next. If under Administrator Profile Type you selected Persistent (with or without selecting Pre-logon/Common), then only Use the following user name and password is available. If you only selected Pre-logon/Common, then the following three authentication methods are available.
- Click OK to save the setting and close the page.
Create a Windows XP* Profile with EAP-FAST Network Authentication
In Cisco Compatible Extensions, Version 3 (CCXv3), Cisco added support for EAP-FAST (Extensible Authentication Protocol-Flexible Authentication via Secure Tunneling), which uses protected access credentials (PACs) to establish an authenticated tunnel between a client and a server.
Cisco Compatible Extensions, Version 4 (CCXv4) improves the provisioning methods for enhanced security and provides innovations for enhanced security, mobility, quality of service, and network management.
Cisco Compatible Extensions, Version 3 (CCXv3)
To set up a client with EAP-FAST authentication with Cisco Compatible Extensions, version 3 (CCXv3):
-
Click Profiles on the WiFi connection utility main window.
Or if you are acting as the administrator, open the Administrator Tool.
- On the Profiles list, click Add to open the Create WiFi Profile General Settings.
- WiFi Network Name (SSID): Enter the network identifier.
- Profile Name: Enter a descriptive profile name.
- Operating Mode: Click Network (Infrastructure). (This parameter is set to Infrastructure if you are using the Administrator Tool.)
- Administrator Profile Type:
Select Persistent or Pre-logon/Common. (This step applies only if you are using the Administrator Tool.)
- Click Next to open the Security Settings.
- Click Enterprise Security.
- Network Authentication: Select WPA-Enterprise or WPA2-Enterprise (Recommended).
- Data Encryption: AES-CCMP is recommended.
- Enable 802.1X: Selected by default.
- Authentication Type: Select EAP-FAST to be used with this connection.
Step 1 of 2: EAP-FAST Provisioning
- Click Disable EAP-FAST Enhancements (CCXv4) to allow provisioning inside a server-unauthenticated TLS tunnel (Unauthenticated-TLS-Server Provisioning Mode).
- Click Select server to view any unauthenticated PACs that have already been provisioned and reside on this computer.
NOTE: If the provisioned PAC is valid, the WiFi connection utility does not prompt the user for acceptance of the PAC. If the PAC is invalid, WiFi connection utility fails the provisioning automatically. A status message is displayed in the Wireless Event Viewer that an administrator can review on the user's computer.
- To import a PAC:
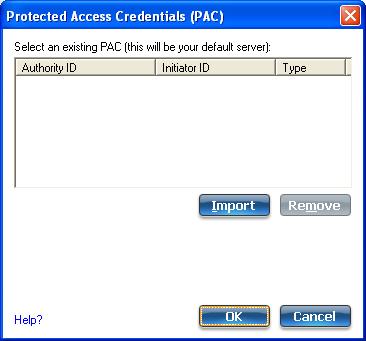
- Click Select server to open the Protected Access Credentials (PAC) list.
- Click Import to import a PAC that resides on this computer or a server.
- Select the PAC and click Open.
- Enter the PAC password (optional).
- Click OK to close this page. The selected PAC is added to PAC list.
- Click Next to select the credential retrieval method or click OK to save the EAP-FAST settings and return to the Profiles list. The PAC is used for this wireless profile.
Step 2 of 2: EAP-FAST Additional Information
To perform client authentication in the established tunnel, a client sends a user name and password to authenticate and establish client authorization policy.
- Click User Credentials to select one of the following credentials retrieval method: Use Windows logon, Prompt each time I connect, or Use the following.
- Click OK to save the settings and close the page. Server verification is not required.
Cisco Compatible Extensions, Version 4 (CCXv4)
To set up a client with EAP-FAST authentication with Cisco Compatible Extensions, version 4 (CCXv4):
-
Click Profiles on the WiFi connection utility main window.
Or if you are acting as the administrator, open the Administrator Tool.
- On the Profiles list, click Add to open the Create WiFi Profile General Settings.
- WiFi Network Name (SSID): Enter the network identifier.
- Profile Name: Enter a descriptive profile name.
- Operating Mode: Click Network (Infrastructure). (This parameter is set to Infrastructure if you are using the Administrator Tool.)
- Administrator Profile Type:
Select Persistent or Pre-logon/Common. (This step applies only if you are using the Administrator Tool.)
- Click Next to open the Security Settings.
- Click Enterprise Security.
- Network Authentication: Select WPA-Enterprise or WPA2-Enterprise (Recommended).
- Data Encryption: AES-CCMP is recommended.
- Enable 802.1X: Selected.
- Authentication Type: Select EAP-FAST to be used with this connection.
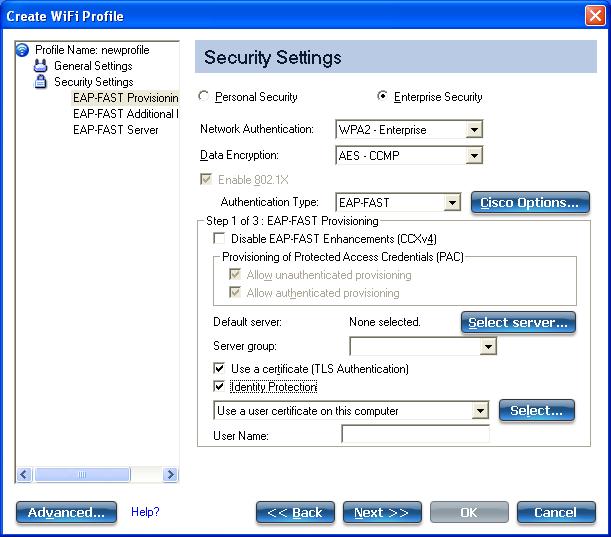
Step 1 of 3: EAP-FAST Provisioning
With CCXv4, EAP-FAST supports two modes for provisioning:
- Server-Authenticated Mode: Provisioning inside a server authenticated TLS tunnel.
- Server-Unauthenticated Mode: Provisioning inside an unauthenticated TLS tunnel.
NOTE: Server-Authenticated Mode provides significant security advantages over Server-Unauthenticated Mode even when EAP-MS-CHAP-V2 is being used as an inner method. This mode protects the EAP-MS-CHAP-V2 exchanges from potential Man-in-the-Middle attacks by verifying the server’s authenticity before exchanging MS-CHAP-V2. Therefore, Server-Authenticated Mode is preferred whenever it is possible. EAP-FAST peer must use Server-Authenticated Mode whenever a certificate or public key is available to authenticate the server and ensure the best security practices.
Provisioning of Protected Access Credentials (PAC):
EAP-FAST uses a PAC key to protect the user credentials that are exchanged. All EAP-FAST authenticators are identified by an authority identity (A-ID). The local authenticator sends its A-ID to an authenticating client, and the client checks its database for a matching A-ID. If the client does not recognize the A-ID, it requests a new PAC.
NOTE: If the provisioned Protected Access Credential (PAC) is valid, the WiFi connection utility does not prompt the user for acceptance of the PAC. If the PAC is invalid, the WiFi connection utility fails the provisioning automatically. A status message is displayed in the Wireless Event Viewer that an administrator can review on the user's computer.
- Verify that Disable EAP-FAST Enhancements (CCXv4) is not selected. Allow unauthenticated provisioning and Allow authenticated provisioning are selected by default. Once a PAC is selected from the Default Server, you can deselect any of these provisioning methods.
- Default Server: None is selected as the default. Click Select Server to select a PAC from the default PAC authority server or select a server from the Server group list. The EAP-FAST Default Server (PAC Authority) selection page opens.
NOTE: Server groups are only listed if you have installed an Administrator Package that contains EAP-FAST Authority ID (A-ID) Group settings.
PAC distribution can also be completed manually (out-of-band). Manual provisioning enables you to create a PAC for a user on an ACS server and then import it into a user's computer. A PAC file can be protected with a password, which the user needs to enter during a PAC import.
- To import a PAC:
- Click Import to import a PAC from the PAC server.
- Click Open.
- Enter the PAC password (optional).
- Click OK closes this page. The selected PAC is used for this wireless profile.
EAP-FAST CCXv4 enables support for the provisioning of other credentials beyond the PAC currently provisioned for tunnel establishment. The credential types supported include trusted CA certificate, machine credentials for machine authentication, and temporary user credentials used to bypass user authentication.
Use a certificate (TLS Authentication)
- Click Use a certificate (TLS Authentication)
- Click Identity Protection when the tunnel is protected.
- Select one of the following to obtain a certificate: Use my smart card, Use the certificate issued to this computer, or Use a user certificate on this computer.
- User Name: Enter the user name assigned to the user certificate.
- Click Next.
Step 2 of 3: EAP-FAST Additional Information
If you selected Use a certificate (TLS Authentication) and Use a user certificate on this computer, click Next (no roaming identity is required) and proceed to Step 3 to configure EAP-FAST Server certificate settings. If you do not need to configure EAP-FAST server settings, click OK to save your settings and return to the Profiles page.
If you selected to Use my smart card, add the roaming identity, if required. Click OK to save your settings and return to the Profiles page.
If you did not select Use a certificate (TLS Authentication), click Next to select an Authentication Protocol. CCXv4 permits additional credentials or TLS cipher suites to establish the tunnel.
Authentication Protocol: Select either GTC, or MS-CHAP-V2 (Default).
Generic Token Card (GTC)
GTC may be used with Server-Authenticated Mode. This enable peers using other user databases as Lightweight Directory Access Protocol (LDAP) and one-time password (OTP) technology to be provisioned in-band. However, the replacement may only be achieved when used with the TLS cipher suites that ensure server authentication.
To configure a one-time password:
- Authentication Protocol: Select GTC (Generic Token Card).
- User Credentials: Select Prompt each time I connect.
- On connection prompt for: Select one of the following:
| Name |
Description |
| Static Password |
On connection, enter the user credentials. |
| One-time password (OTP) |
Obtain the password from a hardware token device. |
| PIN (Soft Token) |
Obtain the password from a soft token program. |
- Click OK.
- Select the profile on the WiFi Networks list.
- Click Connect. When prompted, enter the user name, domain and one-time password (OTP).
- Click OK.
MS-CHAP-V2. This parameter specifies the authentication protocol operating over the PEAP tunnel.
- Authentication Protocol: Select MS-CHAP-V2.
- Select the user credentials: Use Windows logon, Prompt each time I connect, or Use the following.
- Roaming Identity: A Roaming Identity may be populated in this field or you can use %domain%\%username% as the default format for entering a roaming identity.
When 802.1X Microsoft IAS RADIUS is used as an authentication server, the server authenticates the device using the Roaming Identity from Intel PROSet/Wireless WiFi software, and ignores the Authentication Protocol MS-CHAP-V2 user name. Microsoft IAS RADIUS accepts only a valid user name (dotNet user) for the Roaming Identity. For all other authentication servers, the Roaming Identity is optional. Therefore, it is recommended to use the desired realm (for example, anonymous@myrealm) for the Roaming Identity rather than a true identity.
Step 3 of 3: EAP-FAST Server
Authenticated-TLS-Server Provisioning Mode is supported using a trusted CA certificate, a self-signed server certificate, or server public keys and GTC as the inner EAP method.
- Select one of the following credential retrieval methods: Validate Server Certificate or Specify Server or Certificate Name.
- Click OK to close the security settings.
EAP-FAST User Settings
NOTE: If an Administrator Package to be exported to a user's computer does not include the Enable CCXv4 Administrator Tool Application Setting, only EAP-FAST User Settings will be available for configuration.
To set up a client with EAP-FAST authentication:
-
Click Profiles on the WiFi connection utility main window.
Or if you are acting as the administrator, open the Administrator Tool.
- On the Profile page, click Add to open the Create WiFi Profile General Settings.
- WiFi Network Name (SSID): Enter the network identifier.
- Profile Name: Enter a descriptive profile name.
- Operating Mode: Click Network (Infrastructure). (This parameter is set to Infrastructure if you are using the Administrator Tool.)
- Administrator Profile Type:
Select Persistent or Pre-logon/Common. (This step applies only if you are using the Administrator Tool.)
- Click Next to open the Security Settings.
- Click Enterprise Security.
- Network Authentication: Select WPA-Enterprise or WPA2-Enterprise.
- Data Encryption: Select one of the following:
- TKIP provides per-packet key mixing, a message integrity check and a rekeying mechanism.
- AES-CCMP (Advanced Encryption Standard - Counter CBC-MAC Protocol) is used as the data encryption method whenever strong data protection is important. AES-CCMP is recommended.
- Enable 802.1X: Selected.
- Authentication Type: Select EAP-FAST to be used with this connection.
- Click
Cisco Options to select Allow Fast Roaming (CCKM), which enables the client WiFi adapter for fast secure roaming.
Step 1 of 3: EAP-FAST Provisioning (User Settings)
EAP-FAST uses a PAC key to protect the user credentials that are exchanged. All EAP-FAST authenticators are identified by an authority identity (A-ID). The local authenticator sends its A-ID to an authenticating client, and the client checks its database for a matching A-ID. If the client does not recognize the A-ID, it requests a new PAC.
NOTE: If the provisioned Protected Access Credential (PAC) is valid, the WiFi connection utility does not prompt the user for acceptance of the PAC. If the PAC is invalid, the WiFi connection utility fails the provisioning automatically. A status message is displayed in the Wireless Event Viewer that an administrator can review on the user's computer.
- Leave unchecked Disable EAP-FAST Enhancements (CCXv4).
- Allow authenticated provisioning and Allow unauthenticated provisioning are both checked.
- Default Server: None selected is the default. Click Select Server to select a PAC from the default PAC authority server. The Protected Access Credentials selection page opens.
NOTE: Server groups are only listed if you have installed an Administrator Package that contains EAP-FAST Authority ID (A-ID) Group settings.
PAC distribution can also be completed manually (out-of-band). Manual provisioning lets you create a PAC for a user on an ACS server and then import it into a user's computer. A PAC file can be protected with a password, which the user needs to enter during a PAC import.
- To import a PAC:
- Click Import to import a PAC from the PAC server.
- Click Open.
- Enter the PAC password (optional).
- Click OK to close this page. The selected PAC is used for this wireless profile.
- Click Next.
- If this is not a Pre-logon/Common profile, then click Next and jump to Step 3 of 3: EAP-FAST Server.
- If this is a Pre-logon/Common profile, or if you are not using the Administrator Tool to create this profile, proceed to the next step.
Step 2 of 3: EAP-FAST Additional Information
- Authentication Protocol: Select MS-CHAP-V2 or GTC
- User Credentials: Select Use Windows Logon or Use the following.
- If you selected Use the following, then enter the User Name, Domain, Password, and Confirm Password.
- Enter the Roaming Identity: %DOMAIN%\%USERNAME
- Click Next.
Step 3 of 3: EAP-FAST Server
- Click Validate Server Certificate if desired and select the Certificate Issuer from the drop down menu. The default selection is Any Trusted CA.
- If desired, click Specify Server or Certificate Name and enter the name. Then click Server Name must match the specified entry exactly or Domain name must end with the specified entry.
- Click OK.