Get Connected
Connect to a WiFi Network
First Time Connection
Using Wi-Fi Protected Setup*
Configure an Access Point and set up a WiFi Network
Connect an Enrollee to a WiFi Network or Access Point
Add an Enrollee to a WiFi Network at the Registrar
Other Wireless Managers
Connect to a WiFi Network
You can connect to a WiFi network with one of the following methods.
- Automatic connection: If an existing profile matches an available network, you are automatically connected to that wireless network.
- Configure a new profile: Select a wireless network from the list of WiFi networks in the Intel(R) PROSet/Wireless WiFi Connection Utility main window. Click Connect. If you successfully connect, a profile is created in the Profiles list for future use.
- Connect to a profile in the Profiles list: You can select a profile from the Profiles list. To activate it, click Connect. This lets you connect to a network that is lower in the list (if it is available).
- Right-click the Taskbar icon located in the lower right corner of your Windows desktop. Click Connect to Profile. A list of previously configured profiles is listed. Select a profile.
First Time Connection
The WiFi connection utility automatically detects WiFi networks that are within range of your WiFi adapter. When a network is found, a desktop alert notification displays: WiFi networks found. See Taskbar Icons for more information.
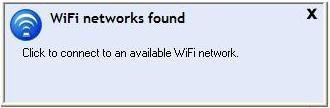
- Double-click the desktop alert to open the WiFi connection utility main window.
- Select a network from the WiFi Networks list.
- Click Connect. If the network does not require security authentication, a desktop alert notifies you that you are connected to the network.
See Main Window and Taskbar for more information about the taskbar menu and icons.
- If the network has security enabled, the Profile Wizard opens the Configure WiFi Settings window. This guides you through the process of creating a WiFi profile for this network. After a profile is created, connecting to this network in the future will be much easier.
- You are requested to specify a Profile Name. The Profile Name is your name for this network. You can accept the existing profile name if present, or enter one. The profile name can be anything that helps you identify this network. For example, My Home Network, Coffee Shop on A Street.
- You are requested to specify WiFi Network Name (SSID): This contains the network identifier name. This is a unique identifier that differentiates one WiFi network from another. If one is already entered, you can keep that.
- Click Next. The Profile Wizard then detects the security settings of this network. The information you enter depends on those security settings. For information about security settings, see Security Settings. For more information about keys and passwords, see Network Keys. For more information about profiles, see Profiles. You may need to contact the network administrator for the information needed to log into this network.
- After entering the required information, click OK to connect to the wireless network.
See Main Window for more information.
Using Wi-Fi Protected Setup* to Configure or Join a Network
Intel(R) PROSet/Wireless WiFi implements Wi-Fi Protected Setup* to permit easy and secure set up and management of a WiFi network. You can use this capability to initially set up a wireless network and to introduce new devices to the network. Wi-Fi Protected Setup simplifies the set up process and at same time helps ensure that the network is configured securely. The following terms are used in this discussion.
- Access Point: A device that connects wireless devices to a network. The access point is configured with the necessary network name (SSID) and security credentials.
- Enrollee: A device that seeks to join an access point or wireless network, but does not have the password or key for the access point or network. Once the computer obtains the valid password or key, it becomes a member of the wireless network. The WiFi connection utility can be configured to operate as an enrollee for a supported access point.
- Registrar: A registrar is a logical entity (usually a computer) that allows other devices (usually computers) to join the wireless network. The WiFi connection utility can be configured to operate as a registrar for a supported access point(s). The registrar securely transfers the access point key or password automatically.
A new wireless network is established by configuring the access point, connecting the desired computers equipped with WiFi adapters, and optionally attaching external network connectivity (i.e. the Internet, typically by connecting the access point to a DSL or cable modem, or equivalent).
Configure an Access Point and Set up a WiFi Network
The following steps will configure this computer as a registrar for a secure network or access point.
- Locate the device ownership password for the access point. This is set by the manufacturer of the access point. The password is often located on a label on the bottom of the device.
- Turn on the network access point.
- At the computer that you want to establish as the registrar, turn on the WiFi connection utility.
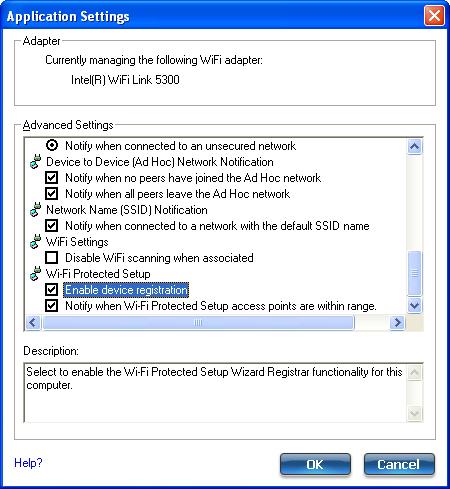
- In the WiFi connection utility, click Tools > Application Settings.
- In the Advanced Settings area under Wi-Fi Protected Setup, turn on Enable device registration.
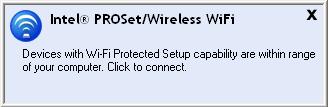
- The next message tells you that one or more compatible devices are within range of your computer. Click this message. (Or, you can select the network from the WiFi Networks list in the WiFi connection utility main window.)
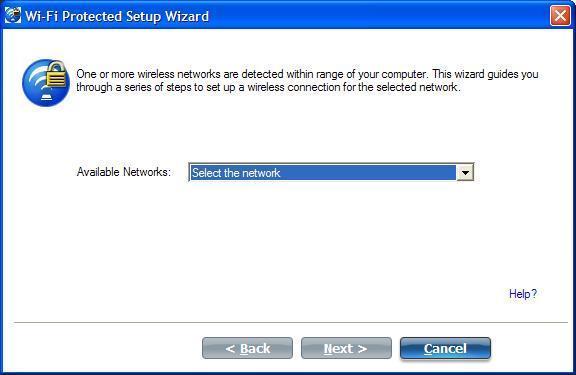
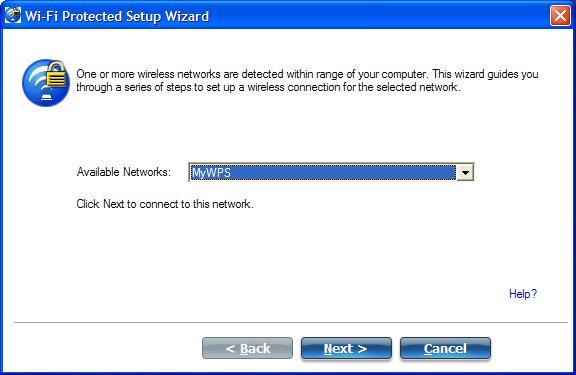
- At the next window, on the Available Networks list, select the network that you want to connect to. The listed networks depends on what is detected. Click Next.
- At the next window, enter the Device Ownership Password that you retrieved from the access point in step 1. Click Next to continue.
- The next window shown displays the Network Name, Security Type, and Password. If the access point is already configured, it is grayed out; proceed to step 10. If the access point is not configured (fields are not grayed out), proceed to step 11.
- After a few seconds the following message is displayed:
The access point is already configured. Do you want to reconfigure it?
If you do not want to reconfigure the access point, select No. The software joins the network, makes the connection, and creates a profile. It then exits and this procedure is completed. If you want to reconfigure the access point, select Yes.
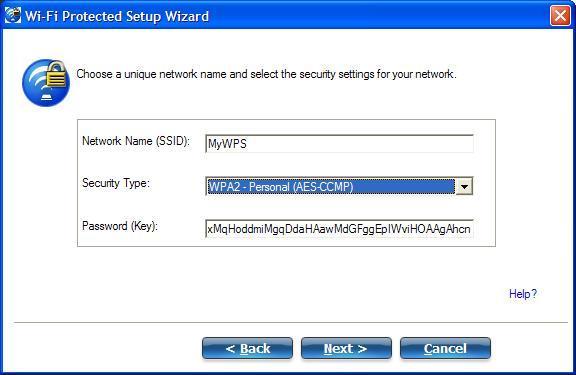
- The next window is displayed. The first field shows the name of the access point. This is by default the Network Name (SSID). In this example we have reset it to MyWPS. You can name it whatever you want.
- In the Security Type field, select the security type you want.
- WPA* Personal requires manual configuration of a pre-shared key (PSK) on the access point and clients. This PSK authenticates a password or identifying code, on both the client station and the access point. An authentication server is not needed.
- WPA2* is the second generation of WPA security that provides enterprise and consumer wireless users with a high level of assurance that only authorized users can access their WiFi networks. Here we have selected WPA2 Personal security. You can use Intel PROSet/Wireless WiFi Connection Utility profiles to obtain the WiFi network name (SSID) and WPA2-Personal pass phrase to use for a legacy device.
- The third field is the Password (Key). The password shown is randomly generated or pre-configured, you can change it to whatever password you want. However you should use a robust key for improved security. It must have between 8 and 63 characters. When you have completed this step, click Next.
The following windows show the configuration of the access point and the registrar.
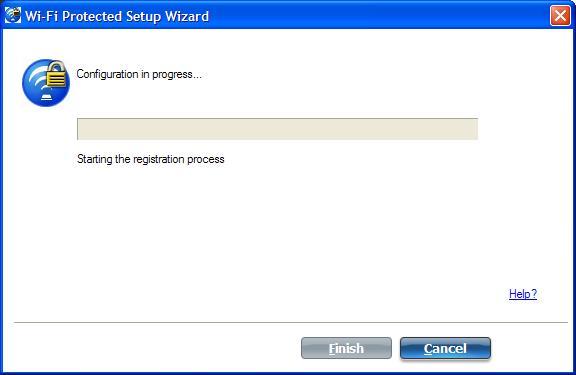
- After the network receives the Ownership Password, you are notified that you have Successfully connected to <name of wireless network>. Click Finish. This process completes configuration of the access point and the registrar.
- If you want to save these settings to a profile for future use by a legacy client, click Save wireless settings. The profile settings are saved to a text file (txt) on your local hard drive. The file is saved to your local C:\ drive by default. Accept the default save location or click Browse to choose another location on your computer.
Next, you can connect an enrollee (computer) to the network using the registrar.
Connect an Enrollee to a WiFi Network or Access Point
Perform these steps to connect an enrollee to the network you just created. This assumes that the registrar computer is running the WiFi connection utility.
NOTE: To achieve transfer rates greater than 54 Mbps on 802.11n connections, WPA2-AES security must be selected. No security (None) can be selected to enable network setup and troubleshooting.
- At the enrollee you want to connect the network, a message tells you that one or more access points with Wi-Fi Protected Setup capability is within range of your wireless computer. Click on this message. (Or, you can select the network from the WiFi Networks list in the WiFi connection utility main window.)
- The WiFi Protected Setup Wizard start up page opens.
Use the Available Networks list to select the network that you want to connect to (in this example it is MyWPS). Then click Next.
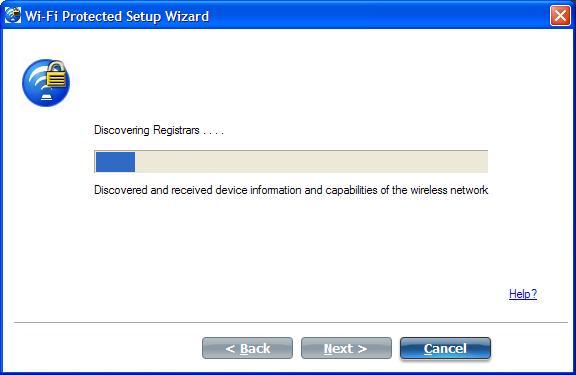
- The Discovery window opens. The enrollee that you want to connect to the network discovers the registrar for the network. Assuming that the Discovery process succeeds, the name of the registrar or access point is displayed.
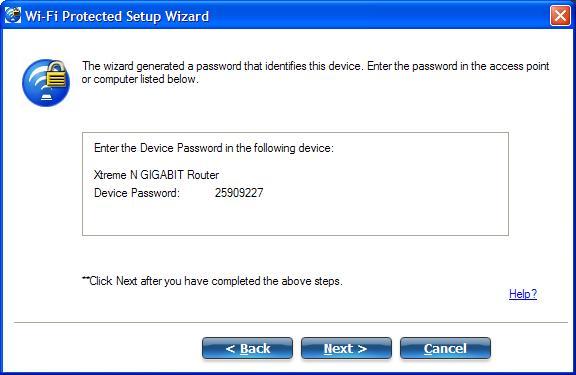
- The next window appears, displaying the Device Password (enrollee password). The password displayed at the enrollee is a unique, randomly generated temporary password for the enrollee. This password is used to ask permission to connect to the network access point. (The password shown below is an example only.).
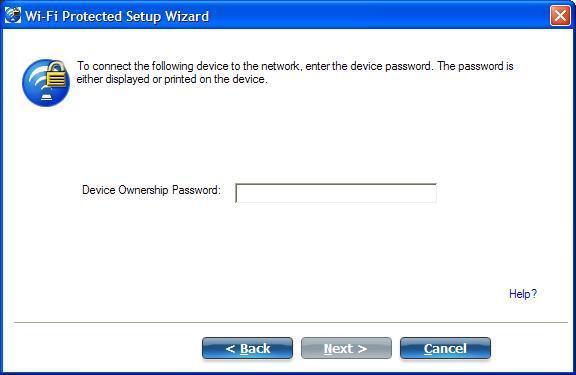
- At the registrar, enter the password provided by the enrollee. Then click Next.
NOTE: This process assumes that the registrar is running the WiFi connection utility; the process and windows displayed at the registrar may be different for software from other vendors. Some access points may have a built in registrar.
- The next window lists the profile for this network. The selected profile will be sent to the enrollee, granting it access to the network. Only supported profiles are displayed. Supported profiles are those based on WPA-PSK, WPA2-PSK, and Open (None) security. Select the profile and click Next to finalize the enrollment process.
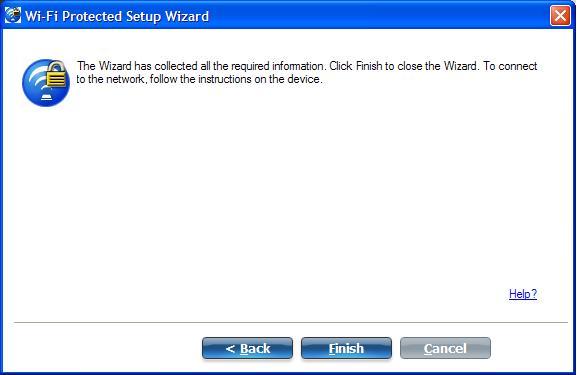
- The last window shows that the enrollee registration with the registrar is complete. Click Finish.
- At the enrollee, click Next. At the enrollee, you are notified when you have Successfully connected to <name of wireless network>. Click Finish.
Add an Enrollee to an Existing WiFi Network at the Registrar
This following procedure lets you add an enrollee to an existing WiFi network, where the access point is already configured and the registrar has already joined the AP.
NOTE: This process assumes that the registrar is running the WiFi connection utility; the process and windows displayed at the registrar may be different for software from other vendors.
- Get the Device Password for the enrollee computer that you want to add to the network.
- At the task tray icon for the WiFi connection utility, right-click and select Add New Device.
- Perform steps 5 through 8 of the procedure Connect an Enrollee to a Network or Access Point.
Other Wireless Managers
If the WiFi connection utility detects another software application trying to communicate with the wireless device, you are notified of this behavior.
Microsoft Windows XP* Wireless Zero Configuration
To switch from the Intel(R) PROSet/Wireless WiFi Connection Utility to the Microsoft Windows XP Wireless Zero Configuration, perform these steps:
- At the Intel(R) PROSet/Wireless WiFi Connection Utility main window, under the Advanced menu, select Use Windows to manage WiFi.
- At the prompt window, you are queried: Do you want Windows to manage your WiFi network connections? Click Yes.
- Click Close to close the Intel(R) PROSet/Wireless WiFi Connection Utility.
- Right-click on the taskbar icon and select Open Wireless Zero Configuration.
NOTE: Any wireless profiles created in the WiFi connection utility are not visible in Microsoft Windows XP Wireless Zero Configuration. If you want to use your Intel wireless profiles, click Enable WiFi control on the main window.
When you are finished using the Microsoft Windows XP Wireless Zero Configuration, you can switch back to the WiFi connection utility To do this, click Enable WiFi control on the WiFi connection utility main window.
Third-Party Wireless Software
If you use software provided by a hotspot location (coffee shop, airport terminal), the WiFi connection utility notifies you and then disables itself. It cannot manage the wireless device when another wireless manager communicates with the wireless device. To take advantage of the WiFi connection utility features, you want to disable or remove this software when you leave the hotspot.